Generate Link Previews in Rails with Microlink
In this tutorial I’ll show you how to leverage the Microlink API to generate link previews in Ruby on Rails.
Step 1: Application Set Up
rails new rails-microlink-example -d=postgresql --webpacker=stimulusrails db:createrails db:migrate
Step 2: Create Link Scaffold
rails g scaffold link url:string-
Prevent null values at the database level.
class CreateLinks < ActiveRecord::Migration[6.1]
  def change
    create_table :links do |t|
      # ℹ️ Prevent null values at the database level
      t.string :url, null: false

      t.timestamps
    end
  end
end
rails db:migrate-
Add validations.
class Link < ApplicationRecord
  # ℹ️ Add validations
  validates :url, presence: true
end
Step 3. Add meta_data column to links table
rails add_meta_data_to_link meta_data:jsonbrails db:migrate-
Use ActiveRecord::Store to serialize data saved to the
meta_datacolumn. We can call these accessors anything we want to, but we’ll use the sames names that at returned from the Microlink responseclass Link < ApplicationRecord # ℹ️ Store meta_data store :meta_data, accessors: %i[description image title], coder: JSON validates :url, presence: true endWe could create a separate column for each
accessor, but usingActiveRecord::Storeallows for greater flexibly and keeps the database simple. -
Update
link_paramsto include values from themeta_datacolumn.class LinksController < ApplicationController private def link_params # ℹ️ Permit values from the meta_data accessor params.require(:link).permit(:url, :description, :image, :title) end end
Step 4: Install and configure Microlink
yarn add @microlink/mql-
touch app/javascript/controllers/microlink_controller.jsimport { Controller } from "stimulus"; import mql from "@microlink/mql"; export default class extends Controller {}If you were you run
rails sand view the console, you would see the following error: -
Update
babel.config.jsby addingsourceType: "unambiguous".module.exports = function (api) { return { // ℹ️ Add this line sourceType: "unambiguous", presets: [].filter(Boolean), }; };

I found this solution be searching for the error and came across these resources:
- https://github.com/webpack/webpack/issues/4039
- https://babeljs.io/docs/en/options#sourcetype
Step 5: Save API Response to Hidden Fields
-
Update the markup in
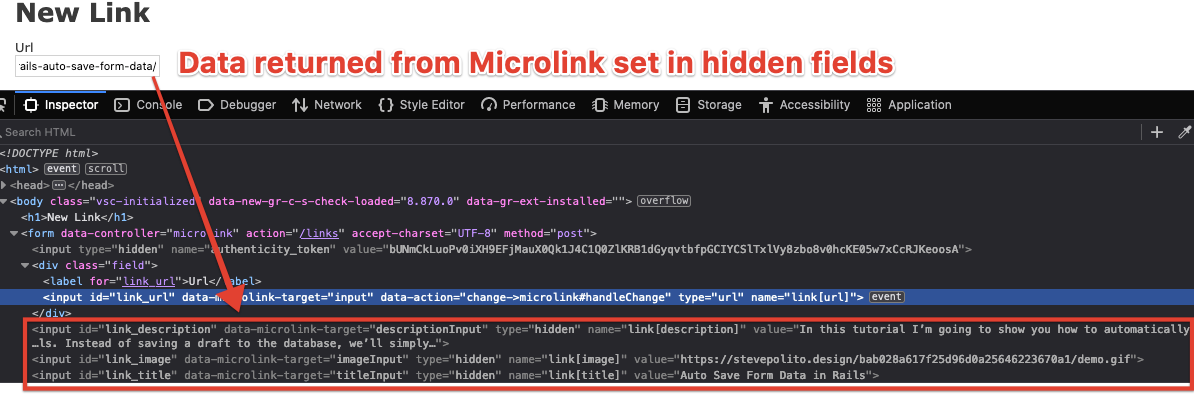
app/views/links/_form.html.erb.<%= form_with(model: link, data: { controller: "microlink" }) do |form| %> <div class="field"> <%= form.label :url %> <%= form.url_field :url, data: { microlink_target: "input", action: "change->microlink#handleChange" } %> </div> <%= form.hidden_field :description, data: { microlink_target: "descriptionInput" } %> <%= form.hidden_field :image, data: { microlink_target: "imageInput" } %> <%= form.hidden_field :title, data: { microlink_target: "titleInput" } %> <% end %> -
Build
handleChangemethod inapp/javascript/controllers/microlink_controller.js.import { Controller } from "stimulus"; import mql from "@microlink/mql"; export default class extends Controller { static targets = ["input", "descriptionInput", "imageInput", "titleInput"]; async handleChange() { const { status, data } = await mql(this.inputTarget.value); if (status == "success") { this.setFormData(data); } } setFormData(data) { this.descriptionInputTarget.value = data?.description ? data?.description : null; this.imageInputTarget.value = data?.image?.url ? data?.image?.url : null; this.titleInputTarget.value = data?.title ? data?.title : null; } }
Now when a user enters a URL, the hidden fields will be set with the response from the Microlink API.
Step 6: Render Link Preview
-
Create a
app/views/links/_preview.html.erbpartial.<div data-microlink-target="output" style="<%= @link.persisted? ? nil : 'display: none;' %>"> <img src="<%= @link.persisted? ? @link.image : nil %>"/> <div> <h5><%= @link.persisted? ? @link.title : nil %></h5> <p><%= @link.persisted? ? @link.description : nil %></p> </div> </div> -
Add the partial to
app/views/links/_form.html.erb.<%= form_with(model: link, data: { controller: "microlink" }) do |form| %> <%# ℹ️ Render the preview parial %> <%= render "preview" %> <% end %> -
Add the partial to
app/views/links/show.html.erb.<p id="notice"><%= notice %></p> <p> <strong>Url:</strong> <%= @link.url %> </p> <%# ℹ️ Render the preview parial %> <%= link_to @link.url, target: "_blank" do %> <%= render "preview" %> <% end %> <%= link_to 'Edit', edit_link_path(@link) %> | <%= link_to 'Back', links_path %> -
Build the
renderPreviewmethod inapp/javascript/controllers/microlink_controller.js.
    import { Controller } from "stimulus";
    import mql from "@microlink/mql";

    export default class extends Controller {
      static targets = [
        "input",
        "descriptionInput",
        "imageInput",
        "titleInput",
        "output",
      ];

      connect() {
        this.previewDescription = this.outputTarget.querySelector("p");
        this.previewImage = this.outputTarget.querySelector("img");
        this.previewTitle = this.outputTarget.querySelector("h5");
      }

      async handleChange() {
        const { status, data } = await mql(this.inputTarget.value);
        if (status == "success") {
          this.setFormData(data);
          this.renderPreview(data);
        }
      }

      renderPreview(data) {
        this.previewDescription.innerHTML = data?.description
          ? data.description
          : null;
        data?.image?.url
          ? this.previewImage.setAttribute("src", data.image.url)
          : null;
        this.previewTitle.innerHTML = data?.title ? data.title : null;
        this.outputTarget.style.display = "block";
      }

      setFormData(data) {
        this.descriptionInputTarget.value = data?.description
          ? data.description
          : null;
        this.imageInputTarget.value = data?.image?.url ? data.image.url : null;
        this.titleInputTarget.value = data?.title ? data.title : null;
      }
    }
At this point you should be able to render a link preview.
Step 7: Attaching the Preview Image to the Link
Right now we’re not actually attaching the image to the Link but rather we’re saving the absolute URL to the image. This means that over time those images could break, since we have no control over them. One solution is to download the image and attach it to the Link using Active Storage.
- Run
rails active_storage:installandrails db:migrateto install Active Storage. -
Add
has_one_attached :thumbnailto Link Model.class Link < ApplicationRecord store :meta_data, accessors: %i[description image title], coder: JSON validates :url, presence: true # ℹ️ Add a thumbnail attachment has_one_attached :thumbnail end - Run
bundle add downto install the down gem. This will make downloading the remote image returned from the Microlink API easier than by doing it with native Ruby. -
Run
rails g job microlink_image_attacherto generate an Active Job. We’ll use this Job to download and attach the image returned from the Microlink API.require "down" class MicrolinkImageAttacherJob < ApplicationJob queue_as :default discard_on Down::InvalidUrl def perform(link) if link.image.present? tempfile = Down.download(link.image) link.thumbnail.attach(io: tempfile, filename: tempfile.original_filename) end end endWe add
discard_on Down::InvalidUrlto discard any job that returns aDown::InvalidUrlexception. This can happen if the Microlink API returns a base64 image. -
Perform MicrolinkImageAttacherJob when a Link is saved.
class LinksController < ApplicationController
  def create
    @link = Link.new(link_params)

    respond_to do |format|
      if @link.save
        # ℹ️ Run the job if the link saved
        MicrolinkImageAttacherJob.perform_now(@link)
      else
      end
    end
  end
end
You could call
perform_laterinstead ofperform_now. -
Render attached thumbnail in
app/views/links/_preview.html.erb.<div data-microlink-target="output" style="<%= @link.persisted? ? nil : 'display: none;' %>"> <%# ℹ️ Render attached thumbnail %> <img src="<%= @link.thumbnail.attached? ? url_for(@link.thumbnail) : nil %>"/> <div> <h5><%= @link.persisted? ? @link.title : nil %></h5> <p><%= @link.persisted? ? @link.description : nil %></p> </div> </div>
Now when you save a link that returns an image, it will be saved in Active Storage.
Step 8: Handling Errors and Improving the UX
Now that we have our happy path complete, we should improve the UX to account for any errors. Most notably, when someone enters an invalid URL or if the Microlink API returns an error.
-
Add markup for rendering a message to
app/views/links/_form.html.erb.<%= form_with(model: link, data: { controller: "microlink" }) do |form| %> <div class="field"> <%= form.label :url %> <%= form.url_field :url, data: { microlink_target: "input", action: "change->microlink#handleChange" } %> <%# ℹ️ Add markup for rendering a message %> <span data-microlink-target="message"></span> </div> <%= render "preview" %> <% end %> -
Update
app/javascript/controllers/microlink_controller.jsto handle errors and render messages.
    import { Controller } from "stimulus";
    import mql from "@microlink/mql";

    export default class extends Controller {
      static targets = [
        "input",
        "descriptionInput",
        "imageInput",
        "titleInput",
        "output",
        "message",
      ];

      connect() {
        this.previewDescription = this.outputTarget.querySelector("p");
        this.previewImage = this.outputTarget.querySelector("img");
        this.previewTitle = this.outputTarget.querySelector("h5");
      }

      async handleChange() {
        this.messageTarget.innerText = null;
        this.clearFormData();
        this.clearPreview();
        if (this.inputTarget.value != "") {
          try {
            const { status, data } = await mql(this.inputTarget.value);
            this.messageTarget.innerText = "Fetching link preview...";
            if (status == "success") {
              this.setFormData(data);
              this.renderPreview(data);
              this.messageTarget.innerText = null;
            } else {
              this.messageTarget.innerText =
                "There was an error fetching the link preview.";
            }
          } catch (e) {
            this.messageTarget.innerText = e;
          }
        }
      }

      clearFormData() {
        this.descriptionInputTarget.value = null;
        this.imageInputTarget.value = null;
        this.titleInputTarget.value = null;
      }

      clearPreview() {
        this.previewDescription.innerHTML = null;
        this.previewImage.setAttribute("src", "");
        this.previewTitle.innerHTML = null;
        this.outputTarget.style.display = "none";
      }

      renderPreview(data) {
        this.previewDescription.innerHTML = data?.description
          ? data.description
          : null;
        data?.image?.url
          ? this.previewImage.setAttribute("src", data.image.url)
          : null;
        this.previewTitle.innerHTML = data?.title ? data.title : null;
        this.outputTarget.style.display = "block";
      }

      setFormData(data) {
        this.descriptionInputTarget.value = data?.description
          ? data.description
          : null;
        this.imageInputTarget.value = data?.image?.url ? data.image.url : null;
        this.titleInputTarget.value = data?.title ? data.title : null;
      }
    }