Create a Proximity Search in WordPress
In this tutorial we are going to build a store locator using a proximity search. Below is the final result.

1. Register for Google Maps Platform
In order to run a proximity search, as well as use the Advanced Custom Fields Google Map, you will need to sign up for Google Maps Platform. Google has recently changed their mapping API, but at the time of this writing, it costs $5.00 USD per 1000 requests.
- Go to Google Maps Platform
- Click Get Started
- When the modal opens, select Places and then click Continue
 Click to expand
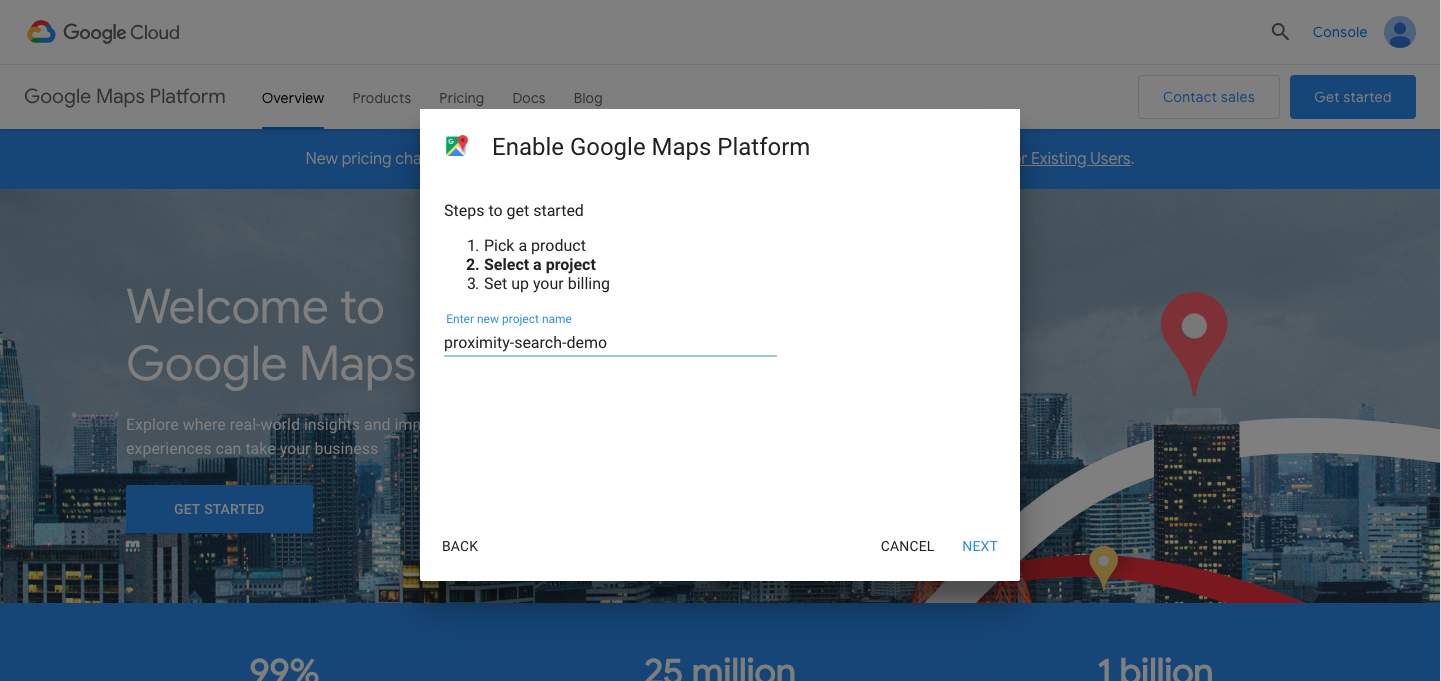
- On the next screen enter a new project name and click Next. I named my project proximity-search-demo
 Click to expand
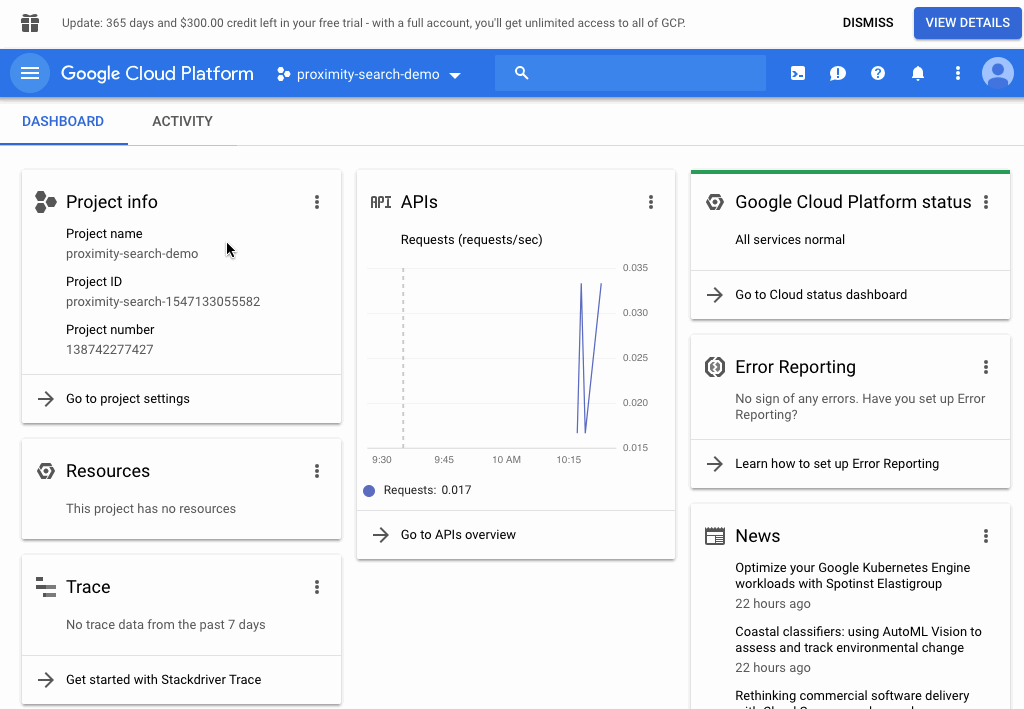
- You will be prompted to create a billing account.
 Click to expand
- Once you add your billing information, confirm that you have the Geocoding API enabled for your project
 Click to expand
- Navigate to the Credentionals page, and copy your API Key
 Click to expand
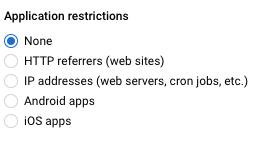
- Make sure you restrict your API key
 Click to expand
- Test that your key is working by navigating to https://maps.googleapis.com/maps/api/geocode/json?address=1600+Amphitheatre+Parkway,+Mountain+View,+CA&key=YOUR_API_KEY. You should get a successful JSON response back.
{
  "results": [
    {
      "address_components": [
        {
          "long_name": "1600",
          "short_name": "1600",
          "types": ["street_number"]
        }
      ],
      "formatted_address": "1600 Amphitheatre Pkwy, Mountain View, CA 94043, USA",
      "geometry": {
        "location": {
          "lat": 37.4220073,
          "lng": -122.0848134
        },
        "location_type": "ROOFTOP"
      }
    }
  ],
  "status": "OK"
}
2. Create a Custom Post Type (Optional)
Now that we have our API Key, we need to create a custom post type to search against. If you already have built a custom post type, you can skip this section.
I will be using WP-CLI to generate the custom post type. I strongly recommend you install the cli and use it for your daily WordPress development.
- Create a mu-plugins directory within the wp-content directory
- Creating a mu-plugins directory ensures any code in this directory will be loaded. This is more effective than adding code to your theme’s functions.php file, since switching themes would remove the custom post type.
- Withing the mu-plugins directory, create a custom-post-types.php file
-
In a terminal window, run
wp scaffold post-type store --dashicon=dashicons-store | pbcopy.- The
| pbcopycommand will copy the generated code. Note that you won’t see any output in your terminal. - Paste the code into custom-post-types.php
<?php /** * Registers the `store` post type. */ function store_init() { register_post_type("store", [ "labels" => [ "name" => __("Stores", "YOUR-TEXTDOMAIN"), "singular_name" => __("Store", "YOUR-TEXTDOMAIN"), "all_items" => __("All Stores", "YOUR-TEXTDOMAIN"), "archives" => __("Store Archives", "YOUR-TEXTDOMAIN"), "attributes" => __("Store Attributes", "YOUR-TEXTDOMAIN"), "insert_into_item" => __("Insert into store", "YOUR-TEXTDOMAIN"), "uploaded_to_this_item" => __( "Uploaded to this store", "YOUR-TEXTDOMAIN" ), "featured_image" => _x("Featured Image", "store", "YOUR-TEXTDOMAIN"), "set_featured_image" => _x( "Set featured image", "store", "YOUR-TEXTDOMAIN" ), "remove_featured_image" => _x( "Remove featured image", "store", "YOUR-TEXTDOMAIN" ), "use_featured_image" => _x( "Use as featured image", "store", "YOUR-TEXTDOMAIN" ), "filter_items_list" => __("Filter stores list", "YOUR-TEXTDOMAIN"), "items_list_navigation" => __( "Stores list navigation", "YOUR-TEXTDOMAIN" ), "items_list" => __("Stores list", "YOUR-TEXTDOMAIN"), "new_item" => __("New Store", "YOUR-TEXTDOMAIN"), "add_new" => __("Add New", "YOUR-TEXTDOMAIN"), "add_new_item" => __("Add New Store", "YOUR-TEXTDOMAIN"), "edit_item" => __("Edit Store", "YOUR-TEXTDOMAIN"), "view_item" => __("View Store", "YOUR-TEXTDOMAIN"), "view_items" => __("View Stores", "YOUR-TEXTDOMAIN"), "search_items" => __("Search stores", "YOUR-TEXTDOMAIN"), "not_found" => __("No stores found", "YOUR-TEXTDOMAIN"), "not_found_in_trash" => __( "No stores found in trash", "YOUR-TEXTDOMAIN" ), "parent_item_colon" => __("Parent Store:", "YOUR-TEXTDOMAIN"), "menu_name" => __("Stores", "YOUR-TEXTDOMAIN"), ], "public" => true, "hierarchical" => false, "show_ui" => true, "show_in_nav_menus" => true, "supports" => ["title", "editor"], "has_archive" => true, "rewrite" => true, "query_var" => true, "menu_icon" => "dashicons-store", "show_in_rest" => true, "rest_base" => "store", "rest_controller_class" => "WP_REST_Posts_Controller", ]); } add_action("init", "store_init"); /** * Sets the post updated messages for the `store` post type. * * @param array $messages Post updated messages. * @return array Messages for the `store` post type. */ function store_updated_messages($messages) { global $post; $permalink = get_permalink($post); $messages["store"] = [ 0 => "", // Unused. Messages start at index 1. /* translators: %s: post permalink */ 1 => sprintf( __( 'Store updated. <a target="_blank" href="%s">View store</a>', "YOUR-TEXTDOMAIN" ), esc_url($permalink) ), 2 => __("Custom field updated.", "YOUR-TEXTDOMAIN"), 3 => __("Custom field deleted.", "YOUR-TEXTDOMAIN"), 4 => __("Store updated.", "YOUR-TEXTDOMAIN"), /* translators: %s: date and time of the revision */ 5 => isset($_GET["revision"]) ? sprintf( __("Store restored to revision from %s", "YOUR-TEXTDOMAIN"), wp_post_revision_title((int) $_GET["revision"], false) ) : false, /* translators: %s: post permalink */ 6 => sprintf( __('Store published. <a href="%s">View store</a>', "YOUR-TEXTDOMAIN"), esc_url($permalink) ), 7 => __("Store saved.", "YOUR-TEXTDOMAIN"), /* translators: %s: post permalink */ 8 => sprintf( __( 'Store submitted. <a target="_blank" href="%s">Preview store</a>', "YOUR-TEXTDOMAIN" ), esc_url(add_query_arg("preview", "true", $permalink)) ), /* translators: 1: Publish box date format, see https://secure.php.net/date 2: Post permalink */ 9 => sprintf( __( 'Store scheduled for: <strong>%1$s</strong>. <a target="_blank" href="%2$s">Preview store</a>', "YOUR-TEXTDOMAIN" ), date_i18n(__("M j, Y @ G:i"), strtotime($post->post_date)), esc_url($permalink) ), /* translators: %s: post permalink */ 10 => sprintf( __( 'Store draft updated. <a target="_blank" href="%s">Preview store</a>', "YOUR-TEXTDOMAIN" ), esc_url(add_query_arg("preview", "true", $permalink)) ), ]; return $messages; } add_filter("post_updated_messages", "store_updated_messages"); - The
- Navigate to /wp-admin/options-permalink.php and save your permalinks. This is needed to flush the permalink structure and ensure the new post type will have an archive page
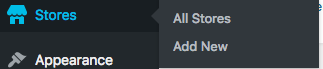
You should now see your new Store post type in the admin menu
3. Install and Configure Advanced Custom Fields
We need a way to store geocoded data to our post type. This will be necessary when calculating the proximity between a store and the origin. Luckily Advanced Custom Fields provides an address field.
- Install and activate Advanced Custom Fields
-
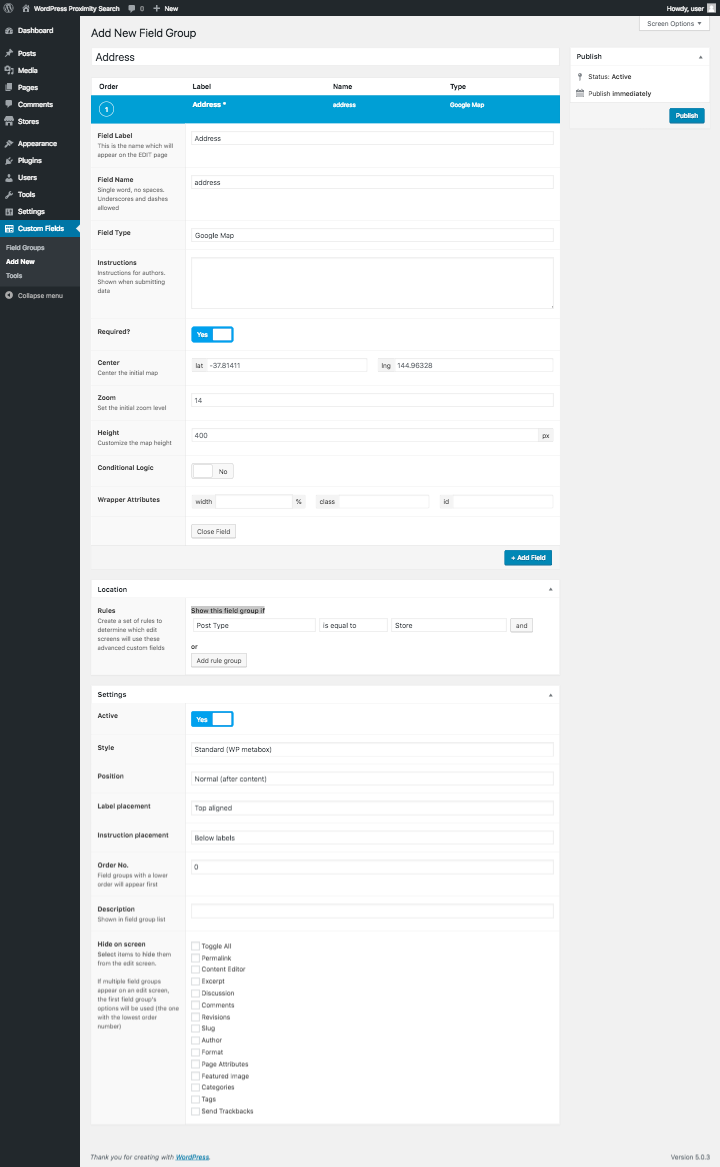
Navigate to /wp-admin/post-new.php?post_type=acf-field-group and add a new field group
- Name the field group Address
- Add a new field
- Set the Field Label to Address
- Set the Field Name to address
- Set the Field Type to Google Map
- Set Required to Yes
- Under Location configure the following rule
- Show this field group if Post Type is equal to Store (or your custom post type)
- Click Publish
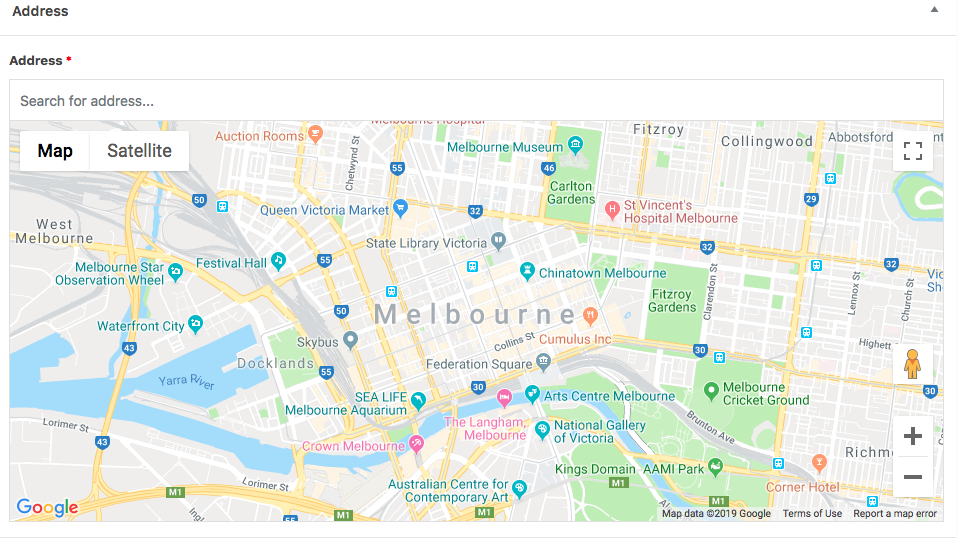
However, you’ll notice that when you add a new post the map is broken.
In order to fix this, we need to use our API Key we created in step 1.7 According to the ACF Docs we need to add the following code to your site’s functions.php.
function my_acf_google_map_api($api)
{
  $api["key"] = "xxx";

  return $api;
}

add_filter("acf/fields/google_map/api", "my_acf_google_map_api");
if using ACF PRO, you may find it easier to update the ‘google_api_key’ setting instead:
function my_acf_init()
{
  acf_update_setting("google_api_key", "xxx");
}

add_action("acf/init", "my_acf_init");
However, I recommend you create an include file to keep the functions.php file organized.
- Create a inc directory in your theme’s directory
- Create a acf-google-map-api.php file within the inc directory
- Add one of the code snippets to this file acf-google-map-api.php
- Include acf-google-map-api.php at the bottom of your theme’s functions.php file

/**
 * ACF Google Map API Key
 */
require get_template_directory() . "/inc/acf-google-map-api.php";
Now if you navigate back to you post type, you’ll notice the map works.
4. Create Functions to Calculate Proximity
Now that we have a post type capable of storing a geoceded address, we can create functions that will calculate the proximity between that address and an origin provided by the user.
I want to give full credit to Brian Johnson’s Article. His article is the basis for everything in the remaining sections.
- Create a proximity-search.php file within the inc directory in your theme’s folder.
-
Include proximity-search.php at the bottom of your theme’s functions.php file
/** * ACF Google Map API Key */ require get_template_directory() . "/inc/acf-google-map-api.php"; /** * Proximity Search */ require get_template_directory() . "/inc/proximity-search.php"; -
Create a function to return the latitude and longitude from a location
This function takes a location (address, zip code, etc), sends it to Google’s Geocoding API. The API will then return a whole lot of JSON. We already did this manually in step 1.9. The only difference is that this function will only return the latitude and longitude.
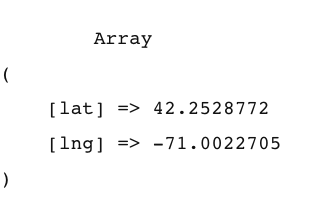
// returns longitude and latitude from a location
function YOUR_THEME_NAME_get_lat_and_lng($origin)
{
  $api_key = "YOUR API KEY";
  $url =
    "https://maps.googleapis.com/maps/api/geocode/json?address=" .
    urlencode($origin) .
    "&key=" .
    $api_key;
  $result_string = file_get_contents($url);
  $result = json_decode($result_string, true);
  $result1[] = $result["results"][0];
  $result2[] = $result1[0]["geometry"];
  $result3[] = $result2[0]["location"];
  return $result3[0];
}
You can manually test the function is working by placing the following code in your index.php file.
<pre> <?php print_r(YOUR_THEME_NAME_get_lat_and_lng("Quincy, MA")); ?> </pre> - Create a function that calculates the distance between two locations.
This function depends on the YOUR_THEME_NAME_get_lat_and_lng function we just created.
// returns distance between two locations
function YOUR_THEME_NAME_get_distance(
  $origin,
  $address_lat,
  $address_lng,
  $unit
) {
  // get lat and lng from provided location
  $origin_coords = YOUR_THEME_NAME_get_lat_and_lng($origin);
  $lat1 = $origin_coords["lat"];
  $lng1 = $origin_coords["lng"];

  // get lat and lng from the address field on the custom post type
  $lat2 = $address_lat;
  $lng2 = $address_lng;

  // calculate distance between locations
  $theta = $lng1 - $lng2;
  $dist =
    sin(deg2rad($lat1)) * sin(deg2rad($lat2)) +
    cos(deg2rad($lat1)) * cos(deg2rad($lat2)) * cos(deg2rad($theta));
  $dist = acos($dist);
  $dist = rad2deg($dist);
  $miles = $dist * 60 * 1.1515;
  $unit = strtoupper($unit);

  // adjust calculation depending on unit
  if ($unit == "K") {
    return $miles * 1.609344;
  } elseif ($unit == "N") {
    return $miles * 0.8684;
  } else {
    return $miles;
  }
}
You can manually test the function is working by placing the following code in your index.php file.
<pre>
    <?php
// 42.2625932 and -71.8022934 are the coordinates for Worcester, MA
// 42.2625932 and -71.8022934 are the coordinates for Worcester, MA
?>print_r(
      YOUR_THEME_NAME_get_distance("Quincy, MA", 42.2625932, -71.8022934)
    ); ?>
</pre>
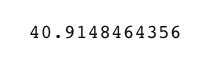
The code worked! I can confirm that Worcester, MA is 40 miles from Quincy, MA
Your proximity-search.php should now look like this:
<?php
// returns longitude and latitude from a location
function YOUR_THEME_NAME_get_lat_and_lng($origin)
{
  $api_key = "YOUR API KEY";
  $url =
    "https://maps.googleapis.com/maps/api/geocode/json?address=" .
    urlencode($origin) .
    "&key=" .
    $api_key;
  $result_string = file_get_contents($url);
  $result = json_decode($result_string, true);
  $result1[] = $result["results"][0];
  $result2[] = $result1[0]["geometry"];
  $result3[] = $result2[0]["location"];
  return $result3[0];
}

// returns distance between two locations
function YOUR_THEME_NAME_get_distance(
  $origin,
  $address_lat,
  $address_lng,
  $unit
) {
  // get lat and lng from provided location
  $origin_coords = YOUR_THEME_NAME_get_lat_and_lng($origin);
  $lat1 = $origin_coords["lat"];
  $lng1 = $origin_coords["lng"];

  // get lat and lng from the address field on the custom post type
  $lat2 = $address_lat;
  $lng2 = $address_lng;

  // calculate distance between locations
  $theta = $lng1 - $lng2;
  $dist =
    sin(deg2rad($lat1)) * sin(deg2rad($lat2)) +
    cos(deg2rad($lat1)) * cos(deg2rad($lat2)) * cos(deg2rad($theta));
  $dist = acos($dist);
  $dist = rad2deg($dist);
  $miles = $dist * 60 * 1.1515;
  $unit = strtoupper($unit);

  // adjust calculation depending on unit
  if ($unit == "K") {
    return $miles * 1.609344;
  } elseif ($unit == "N") {
    return $miles * 0.8684;
  } else {
    return $miles;
  }
}
5. Create a Proximity Search Form
We have everything we need to run a proximity search on our custom post type. Now we just need to create a form and display the results
- Create sample data with a variety of locations. Add a few that are close together.
-
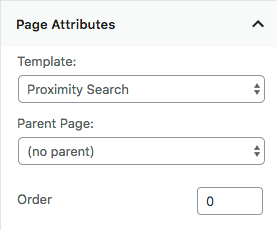
Create a custom page template to display the form and results. I named mine template-proximity-search.php
<?php /** * Template Name: Proximity Search */ -
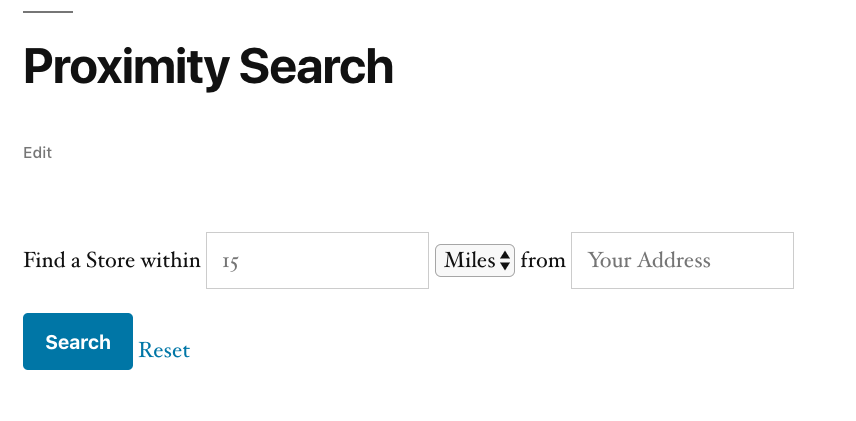
Add the form markup to the page template.
- The value for each field is dynamically rendered based on the parameters in the URL. This means that the values will persist. For example, if I navigate to my search page and append the url with /?proximity=100&units=Miles, the proximity input will have 100 as a value
- Pay special attention to the value of the units select list. One option is set to K because that is a value the YOUR_THEME_NAME_get_distance function can calculate (
if ($unit == "K")). If no value is set, or if the value is not K or N, YOUR_THEME_NAME_get_distance will just calculate in miles. -
The form action is set to
<?php echo get_permalink(); ?>to ensure get request is made to the current page. - The form reset is actually a link, not an input. I’ve set it to
<?php echo get_permalink(); ?>, which will clear the form values by reloading the page.
<form method="get" action="<?php echo get_permalink(); ?>">
    <div>
        <span>Find a Store within</span>
        <input name="proximity" type="number" placeholder="15" value="<?php echo $_GET[
          "proximity"
        ]; ?>" />
            <select name="units">
                <option value="Miles" <?php echo $_GET["units"] === "Miles"
                  ? "selected"
                  : null; ?>>Miles</option>
                <option value="K" <?php echo $_GET["units"] === "K"
                  ? "selected"
                  : null; ?>>Km</option>
            </select>
            <span>from</span>
        <input name="origin" type="text" placeholder="Your Address" value="<?php echo $_GET[
          "origin"
        ]; ?>" />
    </div>
    <div>
        <input type="submit" value="Search" />
        <a href="<?php echo get_permalink(); ?>">Reset</a>
    </div>
</form>
You should see something like this on your custom page template.
If you fill out the form with data, the page should refresh and the url should contain new query parameters your-slug/?proximity=10&units=Miles&origin=Quincy%2C+MA
6. Determine if a Post is Within the User’s Proximity
Now that we have a working form, we need to loop through each post and determine if it’s within the proximity of the user’s location.
-
Add the following after the form we just created in step 5.3. This will save the proximity, origin and units parameters values into variables which we can use later.
<?php // get the parameters from the URL // these parameter names come from the 'name' attribute of each input in the form $proximity = isset($_GET["proximity"]) ? $_GET["proximity"] : null; $origin = isset($_GET["origin"]) ? $_GET["origin"] : null; $unit = isset($_GET["units"]) ? $_GET["units"] : null; ?> -
Now we need to loop over each store, and determine if it’s within the proximity of the user’s search.
- We create an empty $results array to hold the ID of each store that is within the proximity.
- Then, we loop over each store, and run YOUR_THEME_NAME_get_distance against it’s address.
- If the distance is less than the $proximity entered by the user, we add the store ID to the $results array
    // get the parameters from the URL
    // these parameter names come from the 'name' attribute of each input in the form
    $proximity = isset($_GET["proximity"]) ? $_GET["proximity"] : null;
    $origin = isset($_GET["origin"]) ? $_GET["origin"] : null;
    $unit = isset($_GET["units"]) ? $_GET["units"] : null;

    // create an empty array to store results for a later query
    $results = [];

    // only run this query if a user has made a search
    if ($origin) {
      $proximity_query = new WP_Query([
        "post_type" => "store" /* this is the name of our custom post type */,
        "posts_per_page" => -1,
      ]);

      // loop over each result
      // and calculate if it's in the proximity
      if ($proximity_query->have_posts()) {
        while ($proximity_query->have_posts()) {
          $proximity_query->the_post();

          // this is the name of our custom field
          $address = get_field("address");

          if ($address) {
            // calculate distance using our function
            // the $origin values is from the url parameters
            $distance = YOUR_THEME_NAME_get_distance(
              $origin,
              $address["lat"],
              $address["lng"],
              $unit
            );

            // if the distance is less than our threshold,
            // then we are going to add it to our $results array
            // need to use (float) because the original values are strings.
            if ((float) $distance <= (float) $proximity) {
              array_push($results, get_the_ID());
            }
          }
        }
      }

      // reset the $proximity_query
      wp_reset_postdata();
    }
At this point, we still have not displayed anything to the user. In the next section we will take the data from the $results array and use that to display the results.
7. Display the Results
Now we need to craft the correct query in order to display the results.
-
We need to create an array of arguments to pass to a new WP_Query. The arguments will depend on if the user made a search, and if there were any results. Add the following code to the code from 6.2.
- If a search was made, and there are results in the $results array, we use the post__in parameter. This will limit our results to ones within our proximity.
- If a search was made, but there are no results in the $results array, we return an empty array. This will in turn yield no results.
- Finally, if no search was made we update the $results_args to display all results.
// a search was made, and there are results in the '$results' array if ($results && $proximity) { $results_args = [ "post_type" => "store", // we use post__in to find only the posts that are in the '$results' array / "post__in" => $results, ]; // a search was made, but there are no results in the '$results' array } elseif (!$results && $proximity) { $results_args = []; // no search was made, so show all posts } else { $results_args = [ "post_type" => "store", "posts_per_page" => -1, ]; } -
Now that we’ve created our $results_args, we can create a simple WordPress Loop. Add the following to the code from 7.1.
- If a user has made a search, we conditionally display a distance column.
- The get_field(‘address’) is a custom method the Advanced Custom Fields provides.
// a search was made, and there are results in the '$results' array
if ($results && $proximity) {
  $results_args = [
    "post_type" => "store",
    // we use post__in to find only the posts that are in the '$results' array
    "post__in" => $results,
  ];
  // a search was made, but there are no results in the '$results' array
} elseif (!$results && $proximity) {
  $results_args = [];
  // no search was made, so show all posts
} else {
  $results_args = [
    "post_type" => "store",
    "posts_per_page" => -1,
  ];
}

// create a new query to display the results
$results_query = new WP_Query($results_args);
if ($results_query->have_posts()) {
  echo $origin
    ? "<table><thead><tr><th>Name</th><th>Address</th><th>Distance</th></tr></thead><tbody>"
    : "<table><thead><tr><th>Name</th><th>Address</th></tr></thead><tbody>";
  while ($results_query->have_posts()) {
    $results_query->the_post();
    $address = get_field("address");
    $distance = YOUR_THEME_NAME_get_distance(
      $origin,
      $address["lat"],
      $address["lng"],
      $unit
    );
    echo "<tr>";
    echo "<td>" . get_the_title() . "</td>";
    echo "<td>" . $address["address"] . "</td>";
    // if the user made a search, add a column for distance
    echo $origin
      ? "<td>" . round($distance, 2) . " " . $unit . " from you" . "</td>"
      : "";
    echo "</tr>";
  }
  echo "</tbody></table>";
} else {
  echo "<p>No results found</p>";
}

// reset the $results_query
wp_reset_postdata();
The final code should look like this:
<form method="get" action="<?php echo get_permalink(); ?>">
  <div>
    <span>Find a Store within</span>
    <input name="proximity" type="number" placeholder="15" value="<?php echo $_GET[
      "proximity"
    ]; ?>" />
      <select name="units">
        <option value="Miles" <?php echo $_GET["units"] === "Miles"
          ? "selected"
          : null; ?>>Miles</option>
        <option value="K" <?php echo $_GET["units"] === "K"
          ? "selected"
          : null; ?>>Km</option>
      </select>
      <span>from</span>
    <input name="origin" type="text" placeholder="Your Address" value="<?php echo $_GET[
      "origin"
    ]; ?>" />
  </div>
  <div>
    <input type="submit" value="Search" />
    <a href="<?php echo get_permalink(); ?>">Reset</a>
  </div>
</form>

<?php
// get the parameters from the URL
// these parameter names come from the 'name' attribute of each input in the form
$proximity = isset($_GET["proximity"]) ? $_GET["proximity"] : null;
$origin = isset($_GET["origin"]) ? $_GET["origin"] : null;
$unit = isset($_GET["units"]) ? $_GET["units"] : null;

// create an empty array to store results for a later query
$results = [];

// only run this query if a user has made a search
if ($origin) {
  $proximity_query = new WP_Query([
    "post_type" => "store" /* this is the name of our custom post type */,
    "posts_per_page" => -1,
  ]);

  // loop over each result
  // and calculate if it's in the proximity
  if ($proximity_query->have_posts()) {
    while ($proximity_query->have_posts()) {
      $proximity_query->the_post();

      // this is the name of our custom field
      $address = get_field("address");

      if ($address) {
        // calculate distance using our function
        // the $origin values is from the url parameters
        $distance = YOUR_THEME_NAME_get_distance(
          $origin,
          $address["lat"],
          $address["lng"],
          $unit
        );

        // if the distance is less than our threshold,
        // then we are going to add it to our $results array
        // need to use (float) because the original values are strings.
        if ((float) $distance <= (float) $proximity) {
          array_push($results, get_the_ID());
        }
      }
    }
  }

  // reset the $proximity_query
  wp_reset_postdata();
}

// a search was made, and there are results in the '$results' array
if ($results && $proximity) {
  $results_args = [
    "post_type" => "store",
    "post__in" => $results /* we use post__in to find only the posts that are in the '$results' array */,
  ];
  // a search was made, but there are no results in the '$results' array
} elseif (!$results && $proximity) {
  $results_args = [];
  // no search was made, so show all posts
} else {
  $results_args = [
    "post_type" => "store",
    "posts_per_page" => -1,
  ];
}

// create a new query to display the results
$results_query = new WP_Query($results_args);
if ($results_query->have_posts()) {
  // if the user made a search, add a column for distance
  echo $origin
    ? "<table><thead><tr><th>Name</th><th>Address</th><th>Distance</th></thead><tbody>"
    : "<table><thead><tr><th>Name</th><th>Address</th></thead><tbody>";
  while ($results_query->have_posts()) {
    $results_query->the_post();
    $address = get_field("address");
    $distance = YOUR_THEME_NAME_get_distance(
      $origin,
      $address["lat"],
      $address["lng"],
      $unit
    );
    echo "<tr>";
    echo "<td>" . get_the_title() . "</td>";
    echo "<td>" . $address["address"] . "</td>";
    // if the user made a search, add a column for distance
    echo $origin
      ? "<td>" . round($distance, 2) . " " . $unit . " from you" . "</td>"
      : "";
    echo "</tr>";
  }
  echo "</tbody></table>";
} else {
  echo "<p>No results found</p>";
}

// reset the $results_query
wp_reset_postdata();


?>